Radial Immunodiffusion – Principle, Procedure, Result, Uses

The principle of radial immunodiffusion is rooted in the concept of precipitation reactions. It is based on the precipitin curve, which explains that when the appropriate ratio of antigen to antibody is present, visible cross-linked precipitates form as a result of the interaction between antigens and antibodies.
In radial immunodiffusion, the first step involves incorporating the specific antibody into agar, creating a homogeneous mixture. This antibody-impregnated agar is then poured into a glass plate, forming a uniform layer. Circular wells are carefully cut into the agar, and the antigen of interest is introduced into these wells.
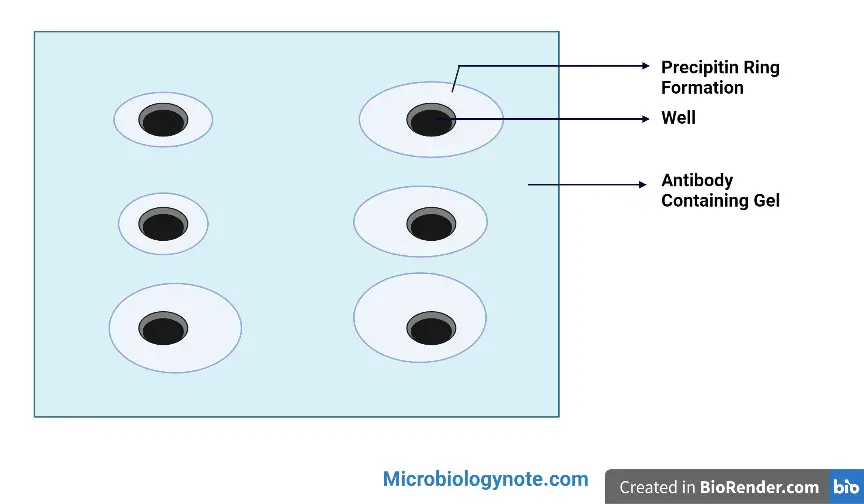
Following the introduction of the antigen into the wells, a diffusion process takes place. The antigen molecules diffuse through the agar in all directions from the wells. As the antigens encounter the corresponding antibodies present in the agar, they form visible precipitates or a ring-shaped band known as a precipitin ring. This ring-shaped band of precipitates concentrically surrounds each well, indicating the occurrence of the antigen-antibody reaction.
The diameter of the precipitate ring that forms is directly proportional to the amount of antigen present in the solution. By measuring the diameter of the ring, it is possible to determine the concentration of the antigen in the original sample.
In summary, the principle of radial immunodiffusion relies on the fundamental concept of precipitation reactions. By incorporating antibodies into agar and introducing specific antigens into wells, the antigens diffuse through the agar, interacting with the corresponding antibodies. This interaction leads to the formation of visible precipitates in the form of a ring-shaped band. The diameter of this precipitate ring corresponds to the antigen concentration in the sample, allowing for quantitative analysis.
Objective of Radial Immunodiffusion
- To detect antigen-antibody complexes.
- Define the conditions under which the antigen-antibody complexes arise.
- Determine the relative amount of antigens.
Materials Required
The following is a list of materials required for performing radial immunodiffusion:
- Agarose: Agarose is a gel matrix used to create the solid gel layer in which the antibody and antigen will diffuse.
- 10X Assay buffer: Assay buffer is a solution used to dilute and prepare the antibody and antigen solutions.
- Antiserum: Antiserum is a serum containing specific antibodies that will react with the antigens of interest.
- Standard Antigen A: Standard Antigen A is a known concentration of the specific antigen used as a reference to establish the calibration curve.
- Standard Antigen B: Standard Antigen B is another known concentration of a specific antigen used as a reference in the calibration curve.
- Standard Antigen C: Similar to Standard Antigen A and B, Standard Antigen C is a known concentration of a specific antigen used as a reference in the calibration curve.
- Standard Antigen D: Standard Antigen D is an additional known concentration of a specific antigen used as a reference in the calibration curve.
- Test Antigen 1: Test Antigen 1 is the antigen of interest whose concentration is to be determined using the radial immunodiffusion assay.
- Test Antigen 2: Similar to Test Antigen 1, Test Antigen 2 is another antigen of interest whose concentration is to be determined.
- Glass plate: A glass plate is used as a solid surface for pouring the agarose and creating the gel layer.
- Gel puncher: A gel puncher is a tool used to cut circular wells in the agarose gel for introducing the antigen samples.
- Template: The template is used to create consistent and uniform wells in the agarose gel.
- Glass wares: Measuring cylinder and beaker are necessary for measuring and preparing the reagents and solutions.
- Reagents: Distilled water and ethanol/isopropanol are required for preparing the assay buffer and cleaning glassware.
- Other requirements: An incubator set at 37°C is needed to allow the diffusion and precipitation reactions to occur. A microwave can be used for melting the agarose. Additional items include a spatula for handling agarose, micropipettes for accurate measurement of samples and reagents, and tips for the micropipettes.
These materials are essential for conducting the radial immunodiffusion assay, enabling the measurement of antigen concentrations through the formation of precipitate rings.
Important Instructions
- It is crucial to read and understand the entire procedure before starting the experiment to ensure accurate execution.
- Always wear gloves throughout the experiment to maintain sterility and prevent contamination.
- Prepare 1X Assay Buffer by adding 1 ml of 10X Assay Buffer to 9 ml of sterile distilled water to obtain a final volume of 10 ml.
- To create a 1% Agarose gel, add 0.1 g of Agarose powder to 10 ml of 1X Assay Buffer. Boil the mixture until the Agarose is completely dissolved.
- Before pouring the Agarose gel onto the glass plates, wipe the plates with cotton to remove any dust or debris. Ensure that the plates are grease-free by using alcohol, as this will facilitate the even spreading of the Agarose.
- When cutting the wells in the Agarose gel, make sure to cut them neatly without any rugged margins. This will allow for precise and consistent sample loading.
- Add the antiserum to the Agarose gel only after it has cooled down to 55°C. Higher temperatures can potentially inactivate the antibodies, compromising the assay results.
- Maintain a humid atmosphere in the experimental setup by ensuring that the moist chamber contains enough wet cotton. This helps prevent the Agarose gel from drying out during the incubation period.
- Prior to pouring the gel, ensure that the slide is grease-free. This will promote proper adhesion of the gel to the slide and prevent any unwanted detachment during the experiment.
- It is recommended to use molecular biology grade double distilled water for optimal results.
By following these instructions, you can enhance the accuracy and reliability of the radial immunodiffusion assay while maintaining the integrity of the samples and reagents used in the experiment.
Procedure of Radial Immunodiffusion
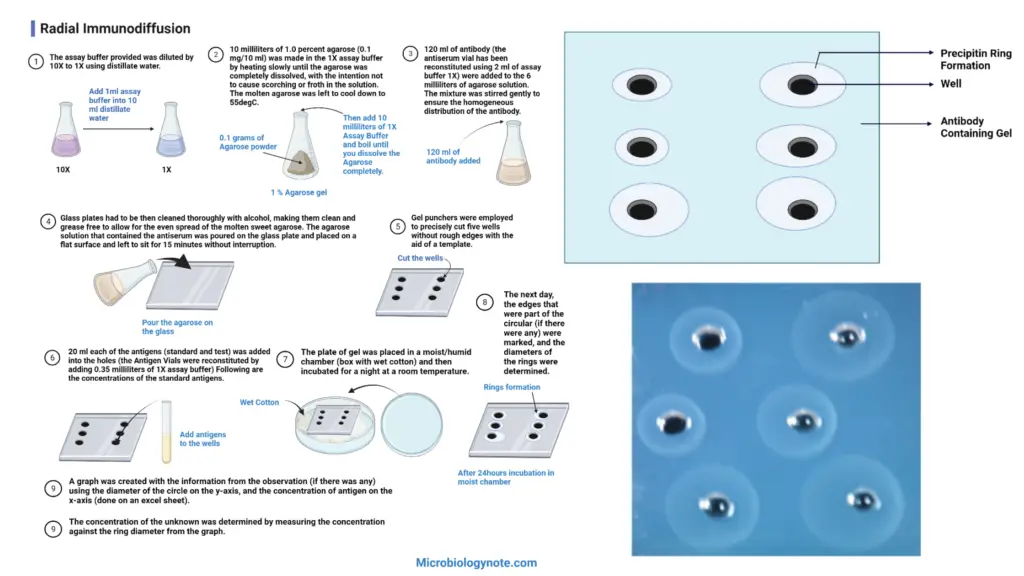
- Dilute the provided assay buffer 10 times by adding distilled water, resulting in a 1X concentration.
- Prepare a 1.0 percent agarose solution by dissolving 0.1 mg of agarose in 10 ml of 1X assay buffer. Heat the mixture slowly to ensure complete dissolution, taking care to avoid scorching or frothing. Allow the molten agarose to cool down to 55°C.
- Add 120 ml of antibody (reconstituted antiserum using 2 ml of 1X assay buffer) to the 6 ml of agarose solution. Gently stir the mixture to ensure a uniform distribution of the antibody.
- Thoroughly clean the glass plates with alcohol to make them clean and grease-free. This step ensures even spreading of the agarose solution. Pour the agarose-antibody mixture onto the glass plate and place it on a flat surface. Allow it to sit undisturbed for 15 minutes.
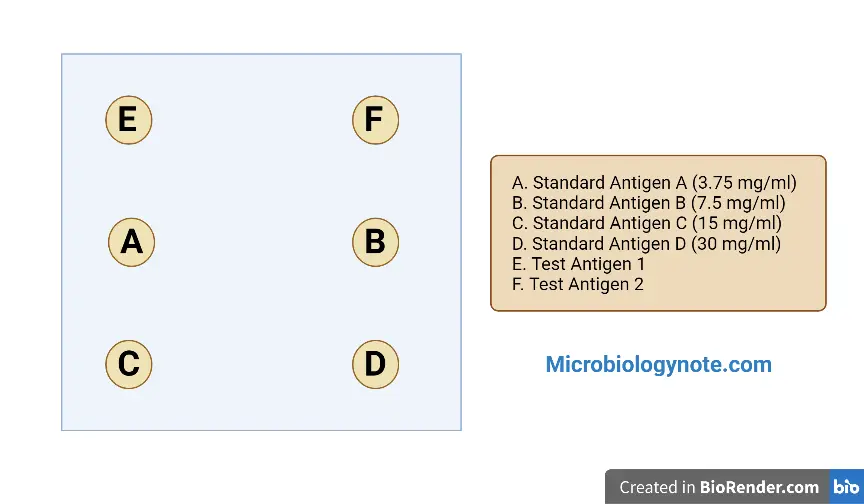
- Use gel punchers and a template to cut five wells in the agarose gel with precise edges and no roughness.
- Add 20 ml of each antigen (standard and test) into the respective wells. The antigen vials should be reconstituted with 0.35 ml of 1X assay buffer. The concentrations of the standard antigens are as follows:
- Standard Antigen A: 0.25 mg/ml
- Standard Antigen B: 0.5 mg/ml
- Standard Antigen C: 1.0 mg/ml
- Standard Antigen D: 2.0 mg/ml
- Test Antigen 1
- Test Antigen 2
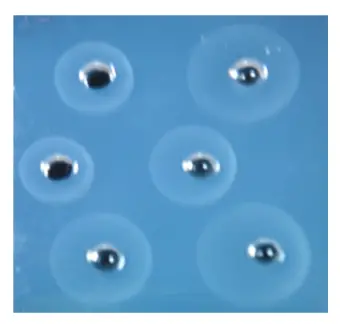
- Place the gel plate in a moist or humid chamber, such as a box with wet cotton, and incubate it overnight at room temperature.
- The next day, mark any circular edges, if present, and measure the diameters of the rings formed around the wells.
- Create a graph using the observed data, with the diameter of the ring on the y-axis and the concentration of antigen on the x-axis. This can be done using spreadsheet software like Excel.
- Determine the concentration of the unknown antigen by measuring the ring diameter and referencing it to the graph created in the previous step.
By following this procedure, you can perform radial immunodiffusion and obtain measurements to determine the concentration of unknown antigens based on the observed ring diameters.
Result Interpretation of Radial Immunodiffusion
- Presence of a precipitin ring: The formation of a precipitin ring around the antigen well indicates a specific interaction between the antigen and antibody. This indicates the presence of the targeted antigen and confirms the successful binding between the antigen and its corresponding antibody.
- Absence of a precipitin ring: If no precipitin ring is observed around the antigen well, it suggests the absence of a reaction between the antigen and antibody. This indicates that the targeted antigen is not present or that the antibody used in the assay does not recognize the antigen. It is important to note that the absence of a ring does not necessarily mean the absence of the antigen in the sample. Other techniques or assays may be required to confirm the absence of the antigen.
- Distance of the precipitin ring: The distance between the antigen well and the precipitin ring provides information about the amount of antigen present in the sample. The greater the amount of antigen in the well, the farther the precipitin ring will form from the well. This allows for a semi-quantitative estimation of antigen concentration. By comparing the diameter of the ring with a standard curve, obtained using known concentrations of antigen, the approximate concentration of the antigen in the sample can be determined.
These results provide valuable information about the presence or absence of the targeted antigen and allow for an estimation of its concentration. The radial immunodiffusion assay serves as a useful tool in various fields, including clinical diagnostics, research, and quality control, by providing insights into antigen-antibody interactions and antigen concentration determination.
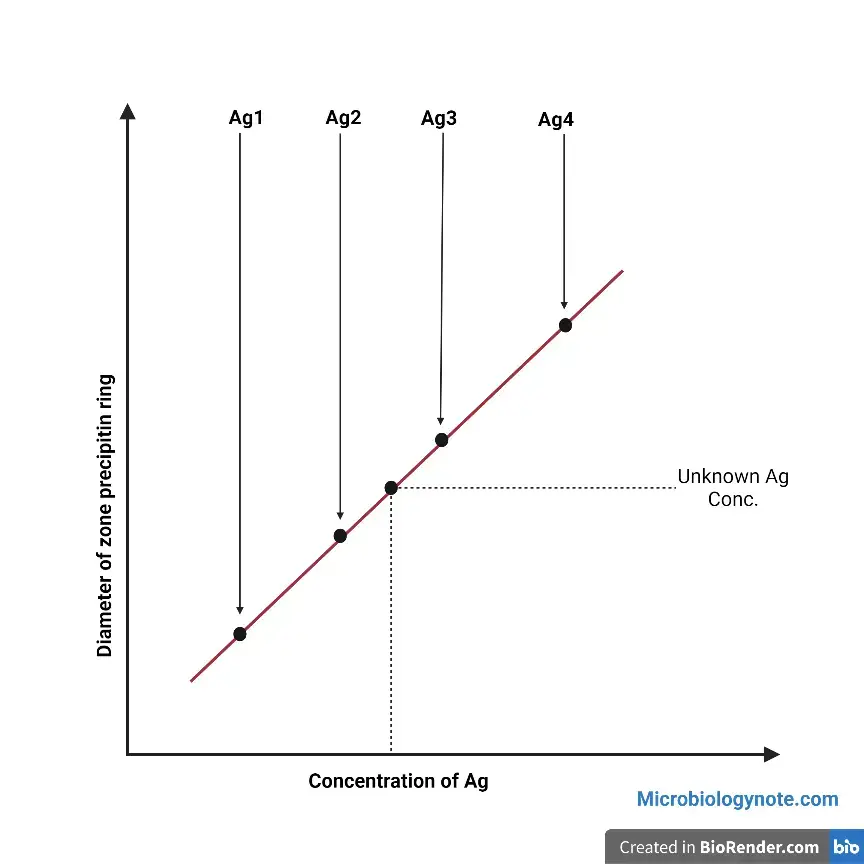
Create a graph that shows the size of the precipitin-based ring (on the Y-axis) in relation to the antigen concentration (on the X-axis) on the standard graph paper. Find the concentration of the unidentified antigen by determining the concentration against the ring diameter.
Troubleshooting Guide
- If no precipitin ring is detected, it could be due to inadequate filling of wells, drying of the agarose gel in the incubation process, or the Inactivation of antiserum. To overcome these issues, the sample is to be loaded right into the tube and not spill onto the sides. Make sure that the chamber is filled with moisture to prevent drying the gel. Antiserum should be added to the agarose gel once the temperature is at 55-60oC.
- If you notice a Blur precipitin ring the reason is the antiserum being inactivated, and uneven dispensing of the gel. To resolve this issue, place it on flat surfaces and begin making the pour. Make sure that the glass plate is not moved until the gel is pour.
Precautions
- Before beginning the experiment, the entire procedure must be thoroughly read.
- Always wear gloves when performing the test.
- The preparation of the 1X Assay Buffer to make 10 milliliters of 1X Assay Buffer to be added, mix 1 milliliter of 10X Assay buffer to 9 ml of sterile distillation water.
- Preparation of 1 % Agarose gel: To make 10 milliliters of Agarose gel, add 0.1 grams of Agarose powder to 10 milliliters of 1X Assay Buffer and boil until you dissolve the Agarose completely.
- Wipe the glass dishes with cotton. Make it free of grease with alcohol to ensure even spread of the agarose.
- Cut the wells in a neat manner, with no rough edges.
- Inject the antiserum into agarose once it has cooled down to 55degC , as higher temperatures will cause the inactivation of the antibody.
- Make sure that the chamber is moist and has enough cotton that is wet to ensure that the air is kept humid.
Applications of Radial Immunodiffusion
Radial immunodiffusion, along with other immuno-diffusion techniques, finds a wide range of applications in immunology and various fields.
- Quantification of antigens: One of the primary applications of radial immunodiffusion is the determination of the quantity or concentration of specific antigens in a sample. By comparing the diameter of the precipitin ring formed around the antigen well with a standard curve, the approximate concentration of the antigen can be determined. This is valuable in clinical diagnostics, research, and quality control settings.
- Estimation of immunoglobulin classes: Radial immunodiffusion can be used to estimate the levels of different immunoglobulin classes, such as IgG, IgM, IgA, IgE, and IgD, in serum samples. This information is essential for assessing the immune response and diagnosing immune-related disorders.
- Antibody estimation: Radial immunodiffusion allows for the estimation of antibody concentrations in serum samples. It can be used to determine the relative concentrations of specific antibodies, such as IgG or IgM, in response to various infectious agents or vaccines.
- Comparative analysis: Radial immunodiffusion is also useful for comparing the properties of different antigens. By performing parallel assays using different antigens, researchers can assess their reactivity, binding affinity, or cross-reactivity with specific antibodies.
- Purity determination: The technique can be employed to assess the relative purity of an antigen preparation. By analyzing the precipitin ring formation, researchers can evaluate the presence of impurities or contaminants in the antigen sample.
- Disease diagnosis: Radial immunodiffusion plays a crucial role in disease diagnosis. It enables the detection of specific antigens or antibodies associated with infectious diseases, autoimmune disorders, and certain cancers. By quantifying these biomarkers, clinicians can aid in diagnosis, monitor disease progression, or assess treatment efficacy.
- Serological surveys: Radial immunodiffusion is employed in serological surveys to determine the prevalence of specific antibodies or antigens in a population. This information helps in understanding the spread of infectious diseases, assessing vaccination coverage, and evaluating the effectiveness of public health measures.
Overall, radial immunodiffusion serves as a versatile tool in immunology and various scientific disciplines, providing valuable insights into antigen-antibody interactions, antigen quantification, and disease diagnostics.
Advantages of Radial Immunodiffusion
- Specific and sensitive results: Radial immunodiffusion is known for providing specific and sensitive results. The precipitation that occurs in the gel matrix allows for the formation of distinct bands, indicating the interaction between antigens and antibodies. This method offers high specificity, as the precipitin bands are formed only when the proper antigen-antibody ratio is present.
- Staining and preservation: The bands of precipitation formed in radial immunodiffusion can be stained, enhancing visibility and making it easier to analyze and interpret the results. Staining also aids in preserving the results for future reference or documentation purposes.
- Multiple antigen detection: Radial immunodiffusion enables the simultaneous detection of multiple antigens in a single experiment. If multiple antigens are present, each antigen-antibody reaction will give rise to a separate line of precipitation. This allows for the identification and quantification of multiple antigens within a sample, providing comprehensive information about the presence and concentration of different targets.
- Identity, cross-reaction, and non-identity assessment: Radial immunodiffusion can be used to assess the identity, cross-reaction, and non-identity between different antigens. By analyzing the patterns of precipitation lines, researchers can determine whether antigens share similar epitopes, exhibit cross-reactivity, or demonstrate distinct immunological properties. This information is crucial for understanding antigen-antibody interactions and can contribute to the characterization of antigens in various applications.
Overall, the advantages of radial immunodiffusion include its specificity, sensitivity, the ability to detect multiple antigens, and its ability to assess identity, cross-reaction, and non-identity. These qualities make radial immunodiffusion a powerful technique for studying antigen-antibody interactions, antigen characterization, and immunological research.
Limitations of Radial Immunodiffusion
- Long reaction time: One significant limitation of radial immunodiffusion is the extended duration of the reaction. The test requires a relatively long incubation period ranging from 18 to 48 hours for optimal diffusion and precipitation to occur. This extended time frame can be impractical in situations where quick results are needed.
- Influence of bound metal cations: Another limitation of the Mancini method, a form of radial immunodiffusion, is the potential impact of bound metal cations present in the test samples (typically proteins). These metal cations can interfere with the antigen-antibody interaction, affecting the accuracy and reliability of the results.
- Relative wastefulness: Compared to other methods, the single diffusion technique used in radial immunodiffusion is considered relatively wasteful. This is because the antigens and antibodies are introduced into separate wells, and only a portion of the reagents participates in the reaction and forms precipitin bands. This inefficiency can lead to increased reagent consumption, making it less cost-effective compared to alternative methods.
- Replacement by more sensitive and automated techniques: In recent years, radial immunodiffusion has been gradually replaced by more sensitive and automated methods such as nephelometry and enzyme-linked immunosorbent assays (ELISA). These newer techniques offer greater sensitivity, faster results, and the ability to analyze a larger number of samples simultaneously. The advancement in technology has made these alternatives more appealing for many researchers and diagnostic laboratories.
Despite these limitations, it’s important to note that radial immunodiffusion still holds value in certain applications and contexts. It may be preferred in cases where its specific characteristics are advantageous or when a simple and cost-effective method is sufficient for the intended purpose.
FAQ
What is radial immunodiffusion?
A radial immunodiffusion (RID) test is used for detecting antibodies associated with an infectious disease, such as viral hepatitis, influenza, rubella, or measles. The RID is a common laboratory method for determining antibody titers in blood samples, and is often used to detect immune response against certain diseases. This test is also known as agglutination reaction.
Which part of the radial immunodiffusion (rid) test system contains the antisera?
In the RIF test system, for example, one measuring hemopexin concentration, the gel would contain the antihemopexin. a standardized volume of serum containing the antigen is added to each well.
How long does radial immunodiffusion need to incubate?
What is radial immunodiffusion used for?
To quantify the concentration of a certain antigen or antibody class in a patient’s serum.
Radial immunodiffusion assay, why not use on ige,igd?
Because they are present in low concentration in our body.
Can single Radial Immunodiffusion be used to measure IgE and complement proteins?
Can single Radial Immunodiffusion be used to measure IgE and complement proteins?
Serum IgE can be measured by enzyme linked immunosorbent assay as it can measure molecules at lower concentrations. Whereas, single radial immunodiffusion cannot measure IgE as it is present in low concentrations in the body
References
- https://www.synbiosis.com/application-notes/single-radial-immunodiffusion/
- https://en.wikipedia.org/wiki/Radial_immunodiffusion
- https://himedialabs.com/TD/HTI004.pdf
- https://www.slideshare.net/prashanthkumarguddeti/antigen-antibody-interactions-63139960
- Parija S.C. (2012). Textbook of Microbiology & Immunology.(2 ed.). India: Elsevier India.
